Getting Started with Databricks AI DevKit: Environment Setup Explained

.png)
Co Author : Jyotirka Rout
This guide walks you through setting up the Databricks AI Dev Kit with your AI coding environment (Claude Code, Cursor, Gemini CLI, Codex, Copilot, Windsurf, OpenCode, Kiro, or Antigravity) on your local machine, from installing dependencies to routing requests through Databricks-hosted Claude models via OAuth. We cover Windows and Mac/Linux, multi-workspace configurations, private link environments, and every "gotcha" we hit along the way so you don't have to.
Introduction to the guide
The Databricks AI-Dev Kit transforms your AI coding environment from a general-purpose coding assistant into a Databricks-aware pair programmer. It injects 34 skill files covering pipelines, jobs, dashboards, Unity Catalog, MLflow, and more, plus an MCP (Model Context Protocol) server that gives your AI coding environment direct, authenticated access to your workspace. Think of it as giving your AI coding environment a Databricks employee badge: it can now query your tables, list your warehouses, create jobs, and build dashboards, all from your terminal.
The real problem: the installation command itself is a one-liner designed for the best-case scenario. But in reality, especially when using Windows, behind corporate firewalls, and with many workspaces being used, there are many flaws. The experience behind the creation of this document came from working with many different clients in v4c.ai.
Architecture: What Gets Installed Where
Before we touch a single command, let's understand the moving parts. This matters because when something breaks, you need to know which layer is failing.
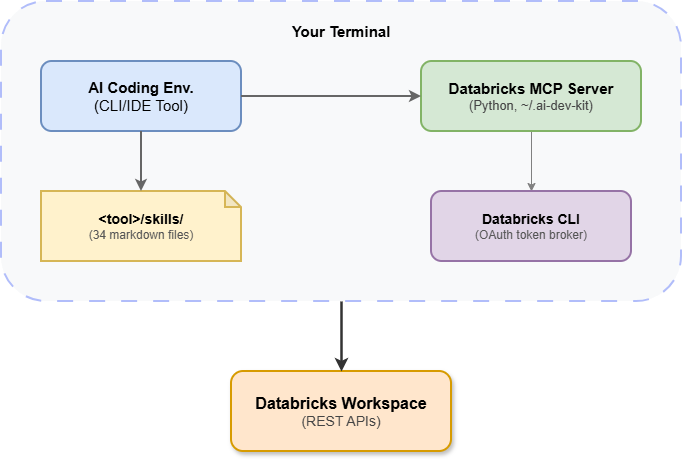
The AI code environment interacts with an MCP server, which is implemented locally as a Python process. It uses the Databricks CLI for authentication purposes and then calls out to Databricks' REST APIs. Skills are modeled using markdown files, and they are uploaded straight to the contextual space in the AI coding environment.
There are three main components of the architecture:
1. AI Coding Environment: AI coding agent that runs either on the user's terminal or Visual Studio Code. Reads skills to set up the Databricks context and makes live workspace calls using the MCP server.
2. AI Dev Kit MCP Server: Runs locally as a Python process in ~/.ai-dev-kit/. Provides access to over 50 tools (such as executing SQL queries, handling jobs, making dashboards, etc.) to the AI coding environment using Model Context Protocol (MCP). Authenticates using the CLI.
3. Databricks CLI: Acts as the authentication broker, containing the OAuth tokens and providing automatic refreshes. All of the authentication requests to Databricks come from the MCP server, which means the CLI needs to be properly configured.
The architecture chosen to interact with Databricks involves local MCP servers using the Databricks CLI for authentication. No secrets will have to be stored in configuration files. OAuth token will stay inside the CLI token cache with automatic refresh while the MCP server requests a token from it. In contrast, if PAT was used, a token would need to be hardcoded in configuration files and refreshed manually. OAuth is the only way to go into production.
Prerequisites
Step-by-Step Process
Step 1: Create Your Project Directory
Although it appears minor, misconfiguring this stage leads to genuine issues. The AI Dev Kit installer creates config files (`.mcp.json`, `.claude/`) relative to your current directory. If you run it from `C:\WINDOWS\system32` (the default PowerShell directory), your config files end up in a system folder where they're hard to find and harder to clean up.
Choosing Between Global and Project-Level AI DevKit Setup
When working with AI DevKit and LLMs like Anthropic Claude or Google Gemini in a local IDE, there are two common ways to manage skills and MCP servers.
1. Global Setup: Best for Stable and Reusable Workflows
A global setup works well when you use the same set of tools, skills, and MCP servers across multiple projects. In this approach, everything is centrally configured and shared globally. It is ideal for stable enterprise workflows, common developer utilities, and reusable infrastructure such as filesystem MCPs, Git integrations, or authentication configurations. The advantage is faster setup and easier reuse, but as projects become more diverse, managing global skills and prompts can become messy and harder to maintain.
Typical repository/setup

~ (Home Directory)
│
├── .ai-dev-kit/             	# Global MCP Server
│   ├── .venv/
│   ├── repo/
│   └── config/
├── .databrickscfg           	# OAuth Profiles
├── .databricks/
│   └── token-cache.json
├── Project-A/
├── Project-B/
└── Project-C/
2. Project-Level Setup: Best for Experimentation and Custom AI Workflows
A project-level setup is better when different projects require different skills, prompts, or MCP integrations. Here, project-specific skills and experimental MCP servers are stored locally within the project itself. This approach provides better isolation, cleaner AI context, and more flexibility to experiment without affecting other projects. It is especially useful for AI engineering workflows where each application may need unique prompts, tools, or behaviors. It also improves reproducibility since anyone cloning the project gets the same AI setup and workflows immediately.
Project-A/
│
├── src/
├── notebooks/
├── prompts/
├── .mcp.json
├── .claude/
├── skills/
│   ├── sql.md
│   ├── pipelines.md
│   └── dashboards.md
└── launch.sh

Project B would have a completely different setup:

Project-B/
│
├── src/
├── prompts/
├── .mcp.json
├── .claude/
├── skills/
│   ├── rag.md
│   ├── agents.md
│   └── evaluation.md
│
└── launch.sh
Recommended Approach
In practice, a hybrid model works best: keep stable infrastructure globally configured, while maintaining project-specific intelligence locally. This combines the convenience of shared tooling with the flexibility and maintainability of isolated project environments.
Home
│
├── .ai-dev-kit/
│   ├── MCP Server
│   ├── Python venv
│   └── Databricks tools
├── .databrickscfg
├── .databricks/
│
├── customer-analytics/
│   ├── .mcp.json
│   ├── .claude/
│   ├── prompts/
│   └── src/
│
├── retail-forecasting/
│   ├── .mcp.json
│   ├── .claude/
│   ├── prompts/
│   └── src/
│
└── llm-evaluation/
    ├── .mcp.json
    ├── .claude/
    ├── prompts/
    └── src/
Our Challenge: On our first Windows deployment, we ran the installer from system32. Everything appeared to install correctly, but the AI coding environment couldn't find the MCP config. We spent 30 minutes debugging auth before realizing the .mcp.json was sitting in C:\WINDOWS\system32\.mcp.json: a location that made no sense for a project config.
Windows (PowerShell):
cd C:\Users\<YourUsername>
mkdir my-databricks-project
cd my-databricks-project
Mac/Linux:
cd ~
mkdir my-databricks-project
cd my-databricks-project
Note: One project folder per Databricks workspace. This keeps configs isolated when you're working across multiple environments.
Step 2: Install uv
uv is the Python package manager the AI Dev Kit uses for its virtual environment. We chose uv over pip because it's significantly faster at dependency resolution; the MCP server has 116 transitive dependencies, and uv resolves them in under 6 seconds versus pip's 45+ seconds.
Windows (PowerShell):
powershell -ExecutionPolicy ByPass -c "irm https://astral.sh/uv/install.ps1 | iex"
Mac/Linux:
curl -LsSf https://astral.sh/uv/install.sh | sh
Close and reopen your terminal, then verify:
uv --version
When NOT to use uv: If your organization mandates a specific Python package manager (e.g., conda for compliance reasons), you can still install the MCP server's dependencies manually with pip after the initial setup. But the installer itself expects uv.
Step 3: Install Databricks CLI
Windows:
winget install Databricks.DatabricksCLI
Mac (Homebrew):
brew tap databricks/tap
brew install databricks
Close and reopen your terminal, then verify:
databricks --version
You need version 0.290 or higher for reliable OAuth U2M (user-to-machine) support.
Step 4: Authenticate with OAuth
This is where we diverge from most tutorials that tell you to generate a PAT. OAuth U2M is superior for three reasons: tokens auto-refresh, no secrets are stored in plaintext, and it integrates with your organization's SSO/MFA.
databricks auth login --host https://<your-workspace-url>.cloud.databricks.com --profile <profile-name>
Your browser opens, you authenticate through your IdP (Okta, Azure AD, etc.), and the CLI stores the OAuth tokens in `~/.databricks/token-cache.json`.
For multiple workspaces:
databricks auth login --host https://dbc-abc123.cloud.databricks.com --profile dev
databricks auth login --host https://dbc-def456.cloud.databricks.com --profile staging
databricks auth login --host https://dbc-ghi789.cloud.databricks.com --profile prod
Verify it works:
databricks warehouses list --profile <profile-name>
You should see your SQL warehouses listed. If this fails,your tool will also fail , the MCP server uses the exact same auth mechanism.
Your ~/.databrickscfg should now look like:
[dev]
host      = https://dbc-abc123.cloud.databricks.com
auth_type = databricks-cli

[staging]
host      = https://dbc-def456.cloud.databricks.com
auth_type = databricks-cli
The `auth_type = databricks-cli` tells the SDK to delegate token management to the CLI binary; this is the OAuth flow, not a stored PAT.
Step 5: Install Your AI Coding Environment (CLI)
Install your chosen AI coding environment using the commands below. For IDE-based tools (Cursor, Windsurf, Kiro), download the installer from the tool’s website; for CLI tools, use the package manager commands shown.
Claude Code (Windows):
winget install Anthropic.ClaudeCode (Claude Code example)
Claude Code (Mac/Linux):
npm install -g @anthropic-ai/claude-code
Gemini CLI (Windows / Mac/Linux):
npm install -g @google/gemini-cli
Verify: gemini --version
Codex / OpenAI Codex CLI (Windows / Mac/Linux):
npm install -g @openai/codex
Verify: codex --version
OpenCode (Windows / Mac/Linux):
npm install -g opencode
Verify: opencode --version
Copilot CLI (Windows / Mac/Linux):
npm install -g @github/copilot-cli
Verify: gh copilot --help
Cursor (IDE - Windows / Mac/Linux):
Download the installer from cursor.com/download and run it. No separate CLI install required.
Windsurf (IDE - Windows / Mac/Linux):
Download the installer from codeium.com/windsurf and run it. No separate CLI install required.
Kiro (IDE - Windows / Mac/Linux):
Download the installer from kiro.dev and run it. No separate CLI install required.
Antigravity (Windows / Mac/Linux):
pip install antigravity-cli
Verify: antigravity --help
Close and reopen your terminal, then verify:
<tool> --version
Once installed, verify by running the tool's version command (e.g. `claude --version`, `cursor --version`). If your tool requires account authentication, complete that step now. If you're routing through Databricks endpoints exclusively, you can skip personal account setup , we cover that in Step 7.
Step 6: Install the AI Dev Kit
Navigate to your project folder and run the installer:
Windows (PowerShell):
cd C:\Users\<YourUsername>\my-databricks-project
irm https://raw.githubusercontent.com/databricks-solutions/ai-dev-kit/main/install.ps1 -OutFile install.ps1
.\install.ps1 --profile <profile-name> --tools <tool-name>
Mac/Linux:
cd ~/my-databricks-project
bash <(curl -sL https://raw.githubusercontent.com/databricks-solutions/ai-dev-kit/main/install.sh) --profile <profile-name> --tools <tool-name>
Our Challenge (PowerShell Execution Policy) : If you get a "running scripts is disabled on this system" error on Windows, run this first:
Set-ExecutionPolicy -Scope CurrentUser -ExecutionPolicy RemoteSigned
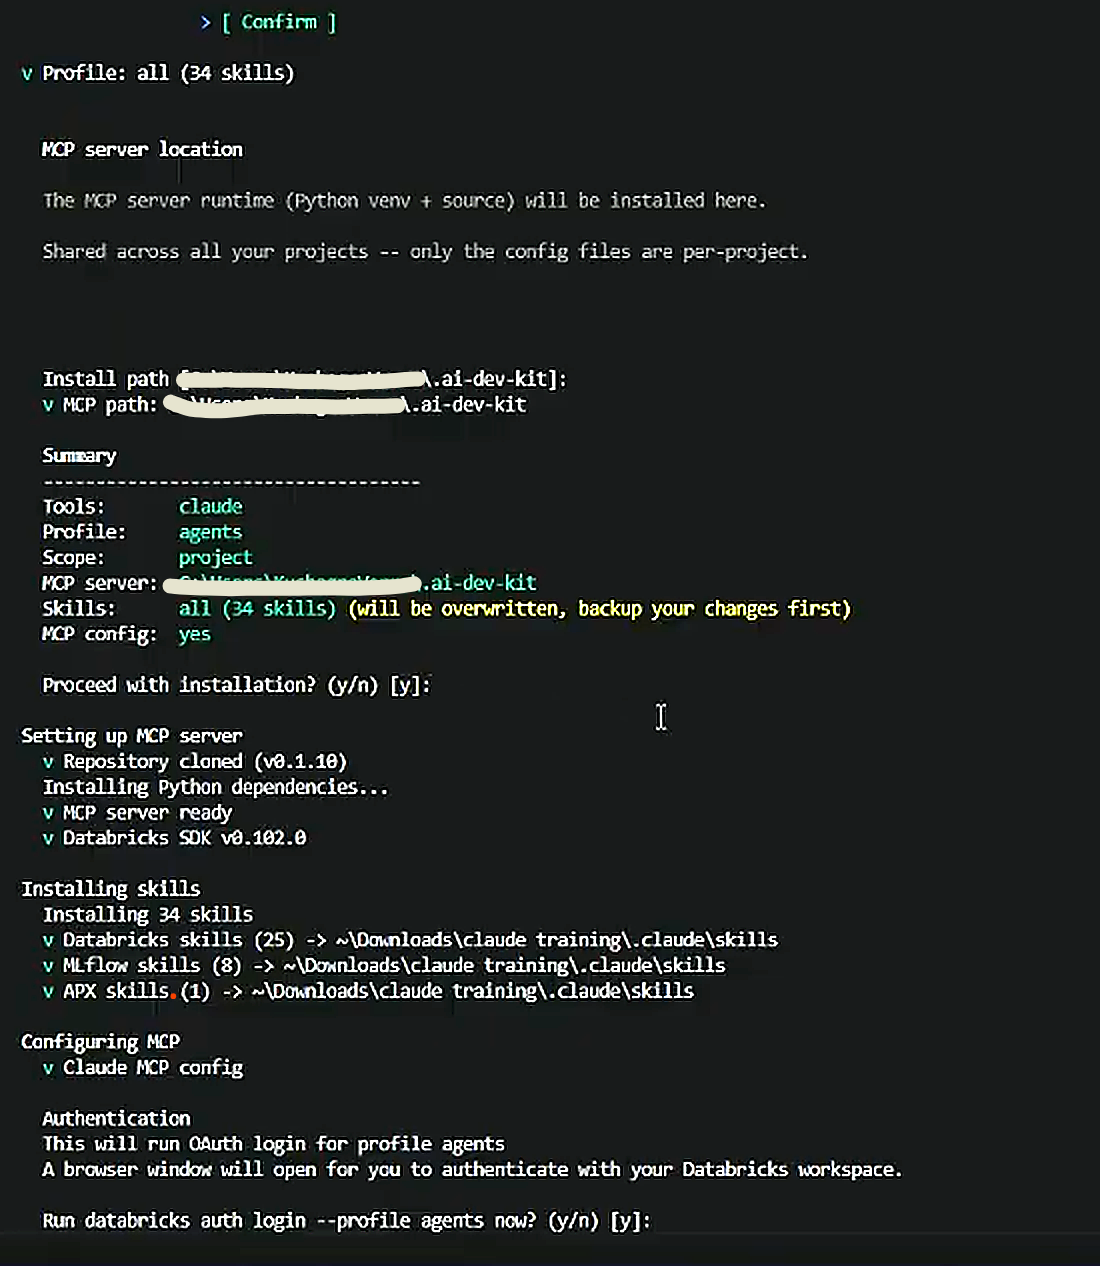
During the interactive prompts:
Once you confirm, the installer will set up the MCP server, install all 34 skills, and configure Claude automatically.
The pywin32 Catastrophe (Windows Only)
This is the most common failure point on Windows. The MCP server depends on `pywin32` (a Windows-specific Python package), and uv’s file caching has a known issue where antivirus software or file locks prevent it from renaming temporary files during download. On Mac, a related issue can occur when SIP (System Integrity Protection) or permission restrictions block uv from writing to certain cache directories.
Symptoms:
x Failed to download `pywin32==311`
  failed to rename file... Access is denied. (os error 5)
The fix:
cd C:\Users\<YourUsername>\.ai-dev-kit
.venv\Scripts\python.exe -m ensurepip
.venv\Scripts\python.exe -m pip install pywin32==311
uv pip install -e repo/databricks-tools-core -e repo/databricks-mcp-server --python .venv/Scripts/python.exe
We use `ensurepip` first because uv creates virtual environments without pip by default. Then we install `pywin32` via pip (which doesn't use uv's cache), and finally install the remaining MCP server dependencies through uv.
Mac/Linux fix (uv permission issue):
If the installer fails on Mac with a permission error or cache write failure, use the same pip-bypass approach inside the Mac venv:
cd ~/.ai-dev-kit
.venv/bin/python -m ensurepip
uv pip install -e repo/databricks-tools-core -e repo/databricks-mcp-server --python .venv/bin/python
The key difference from the Windows fix: Mac uses `.venv/bin/python` (not `.venv\Scripts\python.exe`) and does not need the `pywin32` install step since that package is Windows-only. The root cause is the same , uv’s cache being blocked, and the solution is identical: bootstrap pip manually then let uv finish the install.
After the manual fix, re-run the installer with --force:
cd C:\Users\<YourUsername>\my-databricks-project
.\install.ps1 --profile <profile-name> --tools <tool-name> --force
Scalability note: You only need to do this once per machine. The `~/.ai-dev-kit/` directory is shared across all your projects. Subsequent project setups only create config files ,they don't reinstall the MCP server.
Multi-Workspace Setup
# 1. Authenticate the new workspace
databricks auth login --host https://<new-workspace>.cloud.databricks.com --profile <new-profile>

# 2. Create a new project folder
mkdir ~/new-project && cd ~/new-project

# 3. Run the installer (reuses existing MCP server)
# Windows:
irm https://raw.githubusercontent.com/databricks-solutions/ai-dev-kit/main/install.ps1 -OutFile install.ps1
.\install.ps1 --profile <new-profile> --tools <tool>

# Mac/Linux:
bash <(curl -sL https://raw.githubusercontent.com/databricks-solutions/ai-dev-kit/main/install.sh) --profile <new-profile> --tools <tool>

# 4. Create settings.json or launch script for the new workspace
# 5. Launch: <tool>
Your folder structure ends up looking like:
~/dev-project/       → profile: dev,     AI Gateway: dev workspace
~/staging-project/   → profile: staging, AI Gateway: staging workspace
~/prod-project/      → profile: prod,    AI Gateway: prod workspace
Just `cd` into the right folder and run `yout tool` (or your launch script). Each project is completely isolated.
Troubleshooting Reference
MCP server fails to start (pywin32 error, Windows)
Cause: uv can't install pywin32 due to file lock/antivirus conflicts.
Fix: Install manually via pip (see Step 6, "The pywin32 Catastrophe").
"Request too large (max 20MB)."
Cause: Your AI coding environment is scanning large files in your project.
Fix: Create .claudeignore in your project root:
*.pdf
*.csv
*.parquet
*.xlsx
*.zip
*.ipynb
__pycache__/
.ai-dev-kit/
.venv/
"FailedToOpenSocket" (Private Link)
Cause: The AI Gateway public URL isn't reachable from your VDI.
Fix: Use the workspace URL (*.azuredatabricks.net/serving-endpoints/anthropic) instead.
Token expired mid-session
Cause: The environment variable approach fetches a token once at launch; it expires after ~1 hour.
Fix: Exit your AI coding environment and relaunch via your launch script. The apiKeyHelper approach (Option A) refreshes automatically.
Clean Uninstall
If you need to start completely fresh:
# Remove AI Dev Kit
Remove-Item -Recurse -Force ~/.ai-dev-kit

# Remove project config
Remove-Item -Recurse -Force /path/to/your-project

# Remove Databricks config
Remove-Item -Force ~/.databrickscfg
Remove-Item -Recurse -Force ~/.databricks

# Remove Claude Code (Windows)
winget uninstall Anthropic.ClaudeCode

# Remove Databricks CLI (Windows)
winget uninstall Databricks.DatabricksCLI

# Remove uv (Windows)
Remove-Item -Recurse -Force ~/AppData/Local/uv
How v4c.ai Can Help
v4c.ai is a Databricks Premier Partner with over 750 certifications, 500+ practitioners, and 200+ enterprise clients across industries such as Financial Services, Retail, Manufacturing, and Healthcare. We specialize in deploying the AI Dev Kit across a variety of client environments, ranging from single-developer setups to large-scale enterprise rollouts. Our expert team provides comprehensive turnkey AI Dev Kit deployments, managing everything from OAuth configuration and private link routing to multi-workspace setups and endpoint provisioning, ensuring that your developers can start coding from day one.
Additionally, we focus on custom skill development by going beyond the 34 built-in skills to create organization-specific solutions that align with your naming conventions, pipeline patterns, governance policies, and architectural standards. We also optimize AI Gateway configurations by establishing rate limits, implementing input/output guardrails, monitoring usage, and managing cost allocations to ensure enterprise-grade governance.
To further enhance your team's capabilities, we offer hands-on training and enablement workshops designed to elevate your data engineering, analytics, and ML teams from basic understanding to productive use in just one day.
References
More blog posts

.png)